原创 爱写程序的阿波张 源码游记 2019-05-28
本文是《Go语言调度器源代码情景分析》系列的第21篇,也是第六章《抢占调度》的第1小节。
前面几节我们分析了Goroutine因读写channel等阻塞而导致的被动调度以及通过调用Gosched函数发起的主动调度,现在还剩下最后一种调度方式即抢占调度未讨论,从本节开始,我们就来对它进行分析。
本小节我们需要重点关注:
什么情况下会发生抢占调度;
因运行时间过长而发生的抢占调度有什么特点。
retake函数
在分析调度器初始化的时候我们说过,sysmon系统监控线程会定期(10毫秒)通过retake函数对goroutine发起抢占,下面我们直接从retake函数开始。
runtime/proc.go : 4376

// forcePreemptNS is the time slice given to a G before it is
// preempted.
const forcePreemptNS = 10 * 1000 * 1000 // 10ms

func retake(now int64) uint32 {
    n := 0
    // Prevent allp slice changes. This lock will be completely
    // uncontended unless we're already stopping the world.
    lock(&allpLock)
    // We can't use a range loop over allp because we may
    // temporarily drop the allpLock. Hence, we need to re-fetch
    // allp each time around the loop.
    for i := 0; i < len(allp); i++ { //遍历所有的P
        _p_ := allp[i]
        if _p_ == nil {
            // This can happen if procresize has grown
            // allp but not yet created new Ps.
            continue
        }

        //_p_.sysmontick用于sysmon线程记录被监控p的系统调用时间和运行时间
        pd := &_p_.sysmontick
        s := _p_.status
        if s == _Psyscall { //P处于系统调用之中,需要检查是否需要抢占
            // Retake P from syscall if it's there for more than 1 sysmon tick (at least 20us).
            t := int64(_p_.syscalltick)
            if int64(pd.syscalltick) != t {
                pd.syscalltick = uint32(t)
                pd.syscallwhen = now
                continue
            }
            // On the one hand we don't want to retake Ps if there is no other work to do,
            // but on the other hand we want to retake them eventually
            // because they can prevent the sysmon thread from deep sleep.
            if runqempty(_p_) &&  atomic.Load(&sched.nmspinning)+atomic.Load(&sched.npidle)> 0 && pd.syscallwhen+10*1000*1000 > now {
                continue
            }
            // Drop allpLock so we can take sched.lock.
            unlock(&allpLock)
            // Need to decrement number of idle locked M's
            // (pretending that one more is running) before the CAS.
            // Otherwise the M from which we retake can exit the syscall,
            // increment nmidle and report deadlock.
            incidlelocked(-1)
            if atomic.Cas(&_p_.status, s, _Pidle) {
                if trace.enabled {
                    traceGoSysBlock(_p_)
                    traceProcStop(_p_)
                }
                n++
                _p_.syscalltick++
                handoffp(_p_)
            }
            incidlelocked(1)
            lock(&allpLock)
        } else if s == _Prunning { //P处于运行状态,需要检查其是否运行得太久了
            // Preempt G if it's running for too long.
            //_p_.schedtick:每发生一次调度,调度器++该值
            t := int64(_p_.schedtick)
            if int64(pd.schedtick) != t {
                //监控线程监控到一次新的调度,所以重置跟sysmon相关的schedtick和schedwhen变量
                pd.schedtick = uint32(t)
                pd.schedwhen = now
                continue
            }

            //pd.schedtick == t说明(pd.schedwhen ~ now)这段时间未发生过调度,
            //所以这段时间是同一个goroutine一直在运行,下面检查一直运行是否超过了10毫秒
            if pd.schedwhen+forcePreemptNS > now {
                //从某goroutine第一次被sysmon线程监控到正在运行一直运行到现在还未超过10毫秒
                continue
            }
            //连续运行超过10毫秒了,设置抢占请求
            preemptone(_p_)
        }
    }
    unlock(&allpLock)
    return uint32(n)
}
从代码可以看出,retake函数会根据p的两种不同状态检查是否需要抢占:
_Prunning,表示对应的goroutine正在运行,如果其运行时间超过了10毫秒则对需要抢占;
_Psyscall,表示对应的goroutine正在内核执行系统调用,此时需要根据多个条件来判断是否需要抢占。这些判断我们会在后面进行详细描述。
我们首先来分析由于goroutine运行时间过长而导致的抢占,然后分析goroutine进入系统调用之后发生的抢占。
监控线程提出抢占请求
sysmon线程如果监控到某个goroutine连续运行超过了10毫秒(具体是如何监控到的可以看上面代码中笔者的注释),则会调用preemptone函数向该goroutine发出抢占请求。
runtime/proc.go : 4465

// Tell the goroutine running on processor P to stop.
// This function is purely best-effort. It can incorrectly fail to inform the
// goroutine. It can send inform the wrong goroutine. Even if it informs the
// correct goroutine, that goroutine might ignore the request if it is
// simultaneously executing newstack.
// No lock needs to be held.
// Returns true if preemption request was issued.
// The actual preemption will happen at some point in the future
// and will be indicated by the gp->status no longer being
// Grunning
func preemptone(_p_ *p) bool {
    mp := _p_.m.ptr()
    if mp == nil || mp == getg().m {
        return false
    }
    //gp是被抢占的goroutine
    gp := mp.curg
    if gp == nil || gp == mp.g0 {
        return false
    }

    gp.preempt = true  //设置抢占标志

    // Every call in a go routine checks for stack overflow by
    // comparing the current stack pointer to gp->stackguard0.
    // Setting gp->stackguard0 to StackPreempt folds
    // preemption into the normal stack overflow check.
    //stackPreempt是一个常量0xfffffffffffffade,是非常大的一个数
    gp.stackguard0 = stackPreempt  //设置stackguard0使被抢占的goroutine去处理抢占请求
    return true
}
可以看出,preemptone函数只是简单的设置了被抢占goroutine对应的g结构体中的 preempt成员为true和stackguard0成员为stackPreempt(stackPreempt是一个常量0xfffffffffffffade,是非常大的一个数)就返回了,并未真正强制被抢占的goroutine暂停下来。
既然设置了一些抢占标志,那么就一定需要对这些标志进行处理,下面我们就来分析被抢占的goroutine如何处理这些标志去响应监控线程提出的抢占请求。
响应抢占请求
因为我们并不知道什么地方会对抢占标志进行处理,所以我们首先使用文本搜索工具在源代码中查找"stackPreempt"、“stackguard0"以及"preempt"这3个字符串,可以找到处理抢占请求的函数为newstack(),在该函数中如果发现自己被抢占,则会暂停当前goroutine的执行。然后再查找哪些函数会调用newstack函数,顺藤摸瓜便可以找到相关的函数调用链为
morestack_noctxt()->morestack()->newstack() 从源代码中morestack函数的注释可以知道,该函数会被编译器自动插入到函数序言(prologue)中。我们以下面这个程序为例来做进一步的说明。
package main

import "fmt"

func sum(a, b int) int {
    a2 := a * a
    b2 := b * b
    c := a2 + b2

    fmt.Println(c)

    return c
}

func main() {
    sum(1, 2)
}
为了看清楚编译器会把对morestack函数的调用插入到什么地方,我们用gdb来反汇编一下main函数:
=> 0x0000000000486a80 <+0>:   mov   %fs:0xfffffffffffffff8,%rcx
     0x0000000000486a89 <+9>:   cmp   0x10(%rcx),%rsp
     0x0000000000486a8d <+13>:  jbe   0x486abd <main.main+61>
     0x0000000000486a8f <+15>:  sub   $0x20,%rsp
     0x0000000000486a93 <+19>: mov   %rbp,0x18(%rsp)
     0x0000000000486a98 <+24>: lea   0x18(%rsp),%rbp
     0x0000000000486a9d <+29>: movq   $0x1,(%rsp)
     0x0000000000486aa5 <+37>: movq   $0x2,0x8(%rsp)
     0x0000000000486aae <+46>: callq   0x4869c0 <main.sum>
     0x0000000000486ab3 <+51>: mov   0x18(%rsp),%rbp
     0x0000000000486ab8 <+56>: add   $0x20,%rsp
     0x0000000000486abc <+60>: retq
     0x0000000000486abd <+61>: callq  0x44ece0 <runtime.morestack_noctxt>
     0x0000000000486ac2 <+66>: jmp   0x486a80 <main.main>
在main函数的尾部我们看到了对runtime.morestack_noctxt函数的调用,往前我们可以看到,对runtime.morestack_noctxt的调用是通过main函数的第三条jbe指令跳转过来的。
0x0000000000486a8d <+13>: jbe 0x486abd <main.main+61> …… 0x0000000000486abd <+61>: callq 0x44ece0 <runtime.morestack_noctxt> jbe是条件跳转指令,它依靠上一条指令的执行结果来判断是否需要跳转。这里的上一条指令是main函数的第二条指令,为了看清楚这里到底在干什么,我们把main函数的前三条指令都列出来:
0x0000000000486a80 <+0>: mov %fs:0xfffffffffffffff8,%rcx #main函数第一条指令,rcx = g 0x0000000000486a89 <+9>: cmp 0x10(%rcx),%rsp 0x0000000000486a8d <+13>: jbe 0x486abd <main.main+61> 第二章我们已经介绍过,go语言使用fs寄存器实现系统线程的本地存储(TLS),main函数的第一条指令就是从TLS中读取当前正在运行的g的指针并放入rcx寄存器,第二条指令的源操作数是间接寻址,从内存中读取相对于g偏移16这个地址中的内容到rsp寄存器,我们来看看g偏移16的地址是放的什么东西,首先再来回顾一下g结构体的定义:
type g struct {
    stack               stack
    stackguard0    uintptr
    stackguard1    uintptr
    ......
}

type stack struct {
    lo uintptr  //8 bytes
    hi uintptr  //8 bytes
}
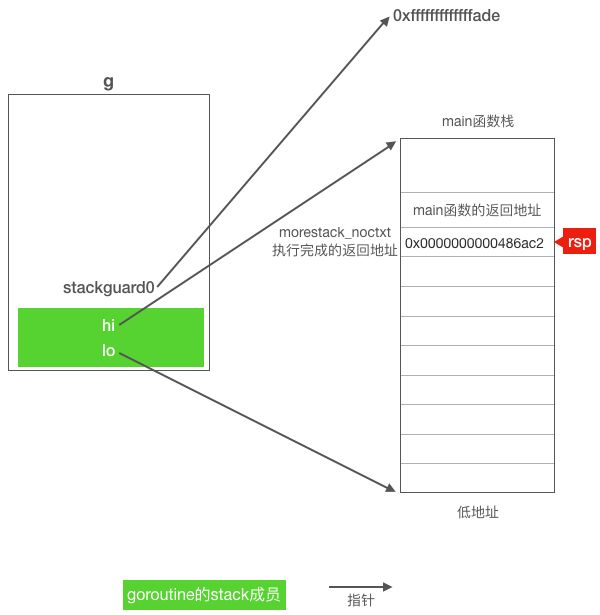
可以看到结构体g的第一个成员stack占16个字节(lo和hi各占8字节),所以g结构体变量的起始位置加偏移16就应该对应到stackguard0字段。因此main函数的第二条指令相当于在比较栈顶寄存器rsp的值是否比stackguard0的值小,如果rsp的值更小,说明当前g的栈要用完了,有溢出风险,需要扩栈,假设main goroutine被设置了抢占标志,那么rsp的值就会远远小于stackguard0,因为从上一节的分析我们知道sysmon监控线程在设置抢占标志时把需要被抢占的goroutine的stackguard0成员设置成了0xfffffffffffffade,而对于goroutine来说其rsp栈顶不可能这么大。因此stackguard0一旦被设置为抢占标记,代码将会跳转到 0x0000000000486abd 处执行call指令调用morestack_noctxt函数,该call指令会把紧跟call后面的一条指令的地址 0x0000000000486ac2 先压入堆栈,然后再跳转到morestack_noctxt函数去执行。下图展示了这一条call指令执行后g,rsp寄存器与main函数栈之间的关系:

morestack_noctxt函数使用JMP指令直接跳转到morestack继续执行,注意这里没有使用CALL指令调用morestack函数,所以rsp栈顶寄存器并没有发生发生变化,与上图一样还是指向存放返回地址的内存处。
morestack函数执行的流程类似于前面我们分析过的mcall函数,首先保存调用morestack函数的goroutine(我们这个场景是main goroutine)的调度信息到对应的g结构的sched成员之中,然后切换到当前工作线程的g0栈继续执行newstack函数。morestack代码如下,跟mcall一样都是使用go汇编语言编写的,这些代码跟mcall和gogo的代码非常类似,所以这里就不再对其进行详细分析了,读者可以自行参考下面的注释理解morestack函数的实现机制。
runtime/asm_amd64.s : 433

// morestack but not preserving ctxt.
TEXT runtime·morestack_noctxt(SB),NOSPLIT,$0
    MOVL  $0, DX
    JMP  runtime·morestack(SB)


// Called during function prolog when more stack is needed.
//
// The traceback routines see morestack on a g0 as being
// the top of a stack (for example, morestack calling newstack
// calling the scheduler calling newm calling gc), so we must
// record an argument size. For that purpose, it has no arguments.
TEXT runtime·morestack(SB),NOSPLIT,$0-0
    ......
    get_tls(CX)
    MOVQ  g(CX), SI  # SI = g(main goroutine对应的g结构体变量)
    ......
    #SP栈顶寄存器现在指向的是morestack_noctxt函数的返回地址,
    #所以下面这一条指令执行完成后AX = 0x0000000000486ac2
    MOVQ  0(SP), AX

    #下面两条指令给g.sched.PC和g.sched.g赋值,我们这个例子g.sched.PC被赋值为0x0000000000486ac2,
    #也就是执行完morestack_noctxt函数之后应该返回去继续执行指令的地址。
    MOVQ  AX, (g_sched+gobuf_pc)(SI) #g.sched.pc = 0x0000000000486ac2
    MOVQ  SI, (g_sched+gobuf_g)(SI) #g.sched.g = g

    LEAQ  8(SP), AX  #main函数在调用morestack_noctxt之前的rsp寄存器

    #下面三条指令给g.sched.sp,g.sched.bp和g.sched.ctxt赋值
    MOVQ  AX, (g_sched+gobuf_sp)(SI)
    MOVQ  BP, (g_sched+gobuf_bp)(SI)
    MOVQ  DX, (g_sched+gobuf_ctxt)(SI)
    #上面几条指令把g的现场保存了起来,下面开始切换到g0运行

    #切换到g0栈,并设置tls的g为g0
    #Call newstack on m->g0's stack.
    MOVQ  m_g0(BX), BX
    MOVQ  BX, g(CX)  #设置TLS中的g为g0
    #把g0栈的栈顶寄存器的值恢复到CPU的寄存器,达到切换栈的目的,下面这一条指令执行之前,
    #CPU还是使用的调用此函数的g的栈,执行之后CPU就开始使用g0的栈了
    MOVQ  (g_sched+gobuf_sp)(BX), SP
    CALL  runtime·newstack(SB)
    CALL  runtime·abort(SB)// crash if newstack returns
    RET
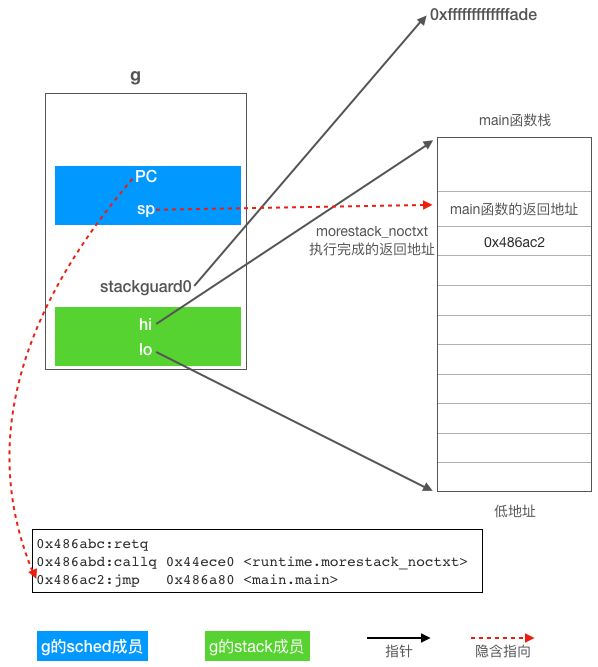
在切换到g0运行之前,当前goroutine的现场信息被保存到了对应的g结构体变量的sched成员之中(见下图)。这样我们这个场景中的main goroutine下次被调度起来运行时,调度器就可以把g.sched.sp恢复到CPU的rsp寄存器完成栈的切换,然后把g.sched.PC恢复到rip寄存器,于是CPU继续执行callq后面的
0x0000000000486ac2 <+66>: jmp 0x486a80 <main.main> 这条指令,就好像是从morestack_noctxt函数返回的一样,虽然实际上并不是从morestack_noctxt函数返回的,但效果一样。

接下来我们继续看newstack函数,该函数主要有两个职责,一个是扩栈,另一个是响应sysmon提出的抢占请求,扩栈部分我们不关注,所以这里只看抢占相关的代码。
runtime/stack.go : 899

// Called from runtime·morestack when more stack is needed.
// Allocate larger stack and relocate to new stack.
// Stack growth is multiplicative, for constant amortized cost.
//
// g->atomicstatus will be Grunning or Gscanrunning upon entry.
// If the GC is trying to stop this g then it will set preemptscan to true.
//
// This must be nowritebarrierrec because it can be called as part of
// stack growth from other nowritebarrierrec functions, but the
// compiler doesn't check this.
//
//go:nowritebarrierrec
func newstack() {
    thisg := getg() // thisg = g0
    ......
    // 这行代码获取g0.m.curg,也就是需要扩栈或响应抢占的goroutine
    // 对于我们这个例子gp = main goroutine
    gp := thisg.m.curg
    ......
    // NOTE: stackguard0 may change underfoot, if another thread
    // is about to try to preempt gp. Read it just once and use that same
    // value now and below.
    //检查g.stackguard0是否被设置为stackPreempt
    preempt := atomic.Loaduintptr(&gp.stackguard0) == stackPreempt

    // Be conservative about where we preempt.
    // We are interested in preempting user Go code, not runtime code.
    // If we're holding locks, mallocing, or preemption is disabled, don't
    // preempt.
    // This check is very early in newstack so that even the status change
    // from Grunning to Gwaiting and back doesn't happen in this case.
    // That status change by itself can be viewed as a small preemption,
    // because the GC might change Gwaiting to Gscanwaiting, and then
    // this goroutine has to wait for the GC to finish before continuing.
    // If the GC is in some way dependent on this goroutine (for example,
    // it needs a lock held by the goroutine), that small preemption turns
    // into a real deadlock.
    if preempt {
        //检查被抢占goroutine的状态
        if thisg.m.locks != 0 || thisg.m.mallocing != 0 || thisg.m.preemptoff != "" || thisg.m.p.ptr().status != _Prunning {
            // Let the goroutine keep running for now.
            // gp->preempt is set, so it will be preempted next time.
            //还原stackguard0为正常值,表示我们已经处理过抢占请求了
            gp.stackguard0 = gp.stack.lo + _StackGuard

            //不抢占,调用gogo继续运行当前这个g,不需要调用schedule函数去挑选另一个goroutine
            gogo(&gp.sched) // never return
        }
    }

    //省略的代码做了些其它检查所以这里才有两个同样的判断

    if preempt {
        if gp == thisg.m.g0 {
            throw("runtime: preempt g0")
        }
        if thisg.m.p == 0 && thisg.m.locks == 0 {
            throw("runtime: g is running but p is not")
        }
        ......
        //下面开始响应抢占请求
        // Act like goroutine called runtime.Gosched.
        //设置gp的状态,省略的代码在处理gc时把gp的状态修改成了_Gwaiting
        casgstatus(gp, _Gwaiting, _Grunning)

        //调用gopreempt_m把gp切换出去
        gopreempt_m(gp) // never return
    }
    ......
}
newstack函数首先检查g.stackguard0是否被设置为stackPreempt,如果是则表示sysmon已经发现我们运行得太久了并对我们发起了抢占请求。在做了一些基本的检查后如果当前goroutine可以被抢占则调用gopreempt_m函数完成调度。
runtime/proc.go : 2644

func gopreempt_m(gp *g) {
    if trace.enabled {
        traceGoPreempt()
    }
    goschedImpl(gp)
}
gopreempt_m通过调用goschedImpl函数完成实际的调度切换工作,我们在前面主动调度一节已经详细分析过goschedImpl函数,该函数首先把gp的状态从_Grunning设置成_Grunnable,并通过dropg函数解除当前工作线程m和gp之间的关系,然后把gp放入全局队列等待被调度器调度,最后调用schedule()函数进入新一轮调度。
小结
上面我们分析了由于运行时间过长导致的抢占调度,可以看到go的抢占调度机制并非无条件的抢占。需要抢占时,监控线程负责给被抢占的goroutine设置抢占标记,被抢占的goroutine再在函数的的入口处检查g的stackguard0成员决定是否需要调用morestack_noctxt函数,从而最终调用到newstack函数处理抢占请求。
下一节我们再来看因系统调用而发生的抢占调度。
最后,如果你觉得本文对你有帮助的话,麻烦帮忙点一下文末右下角的 在看 或转发到朋友圈,非常感谢!
